
OS 개발 - Bare Bones
Bare Bones
OSDev Wiki의 Bare Bones 튜토리얼을 따라하며 운영체제 개발의 첫발을 딛기로 하였다.
처음에는 바로 리눅스 커널 소스를 디버깅하면서 시작하려고 했었다. 학교에서 운영체제 수업을 들은 터라 배경지식도 어느 정도 있다고 생각했었고, 학부연구생 하면서 커널 소스를 어느 정도 디버깅할 줄 안다고 생각했기에 그렇게 오만했었던 것 같다.
리눅스 터널 책을 아무리 봐도, 커널 소스를 아무리 봐도 근본적인 물음이 가시지 않았다. 그래서 어떻게 운영체제가 부팅되어 작동되는지, 가상 페이지는 언제 활성화 되는지와 같은 질문들에 대한 대답들이 손에 잡히지 않았다. 실제로 조그마한 운영체제라도, 조악한 커널이라도, 작동되는 것을 내 손으로 만들어봐야 확실한 이해가 될 수 있을 것 같았다. 이와 같은 점들을 고려했을 때, OSDev Wiki의 튜토리얼들은 시발점으로 안성맞춤이었다.
해 포스트는 가장 기본이 되는 튜토리얼을 수행하는 과정을 담은 포스트이다. 기본적으로 Bare Bones 튜토리얼의 요약을 담고 있으며, 개인적으로 부딪혔던 시행착오를 덧붙였다.
Cross Compiler
커널을 개발할 때 무작정 개발 중인 컴퓨터에 깔려있는 gnu toolchain을 사용하면 안된다. 해당 toolchain은 우리가 목표로 하고 있는 컴퓨터(TGT)에 맞는 결과물이 아니라 내 컴퓨터(HOST)에 맞는 결과물(*.bin, *.o, …)을 생성한다. 또한, 컴파일 등을 할때 HOST에 맞는 외부 라이브러리를 이용하게 된다. TGT는 linux(예를 들어)가 아니기 때문에 linux임을 가정하고 생성된 라이브러리들을 이용하게 되면 컴파일에 실패하거나 성공하더라도 제대로 작동하지 않는다. 이러한 에러를 막기위해선, HOST를 이용해서 TGT에서 구동 가능한 결과물을 얻도록 하는 크로스 컴파일러를 만들어 사용해야 한다.
GCC Cross-Compiler
HOST가 linux이기 때문에 gcc를 이용한 크로스 컴파일러를 만들려 한다. TGT는 임의로 i686-elf를 선택한다. 크로스 컴파일러의 gcc 버전은 11.4.0, binutils 버전은 2.41을 목표로 한다.
먼저 필요한 패키지들을 설치한다. 해당 패키지들을 사용하여 크로스 컴파일러를 빌드한다.
  sudo apt update
  sudo apt install  build-essential bison flex libgmp3-dev libmpc-dev libmpfr-dev texinfo libisl-dev -y
이후, 필요한 소스코드들을 다운로드 받고 압축 해제를 진행한다.
  wget https://ftp.gnu.org/gnu/binutils/binutils-2.41.tar.gz
  tar -xzf binutils-2.41.tar.gz

  wget https://ftp.gnu.org/gnu/gcc/gcc-11.4.0/gcc-11.4.0.tar.gz
  tar -xzf gcc-11.4.0.tar.gz
소스파일과 바이너리 파일이 위치할 디렉토리($corssPath)를 만들고,
해당 디렉토리에 소스파일을 옮기고, $crossPath/bin 디렉토리를 생성한다.
이와 같은 정보들이 담긴 환경 변수들을 설정하고,
  export PREFIX="$crossPath"
  export TARGET=i686-elf
  export PATH="$binPath:$PATH"
binutils와 gcc를 차례로 빌드한다.
  cd "$crossPath/src"
  mkdir build-binutils
  cd build-binutils
  ../binutils-2.41/configure --target="$TARGET" --prefix="$PREFIX" --with-sysroot --disable-nls --disable-werror
  make
  make install
  cd "$crossPath/src"
  which -- $TARGET-as || echo $TARGET-as is not in the PATH

  mkdir build-gcc
  cd build-gcc
  ../gcc-11.4.0/configure --target=$TARGET --prefix="$PREFIX"\
   --disable-nls --enable-languages=c,c++ --without-headers --disable-hosted-libstdcxx
  make all-gcc
  make all-target-libgcc
  make all-target-libstdc++-v3
  make install-gcc
  make install-target-libgcc
  make install-target-libstdc++-v3
이와 같은 과정을 거치면, i686-elf-gcc등의 크로스 컴파일러가 $crossPath/bin에 위치한다.
해당 경로를 환경변수에 등록하면 터미널에서 크로스 컴파일러를 사용할 수 있게 된다.
Bootstrap
가장 먼저 해야 할 일은 부트 로더가 커널을 로딩할 수 있게 하는 코드를 작성하는 것이다.
부트 로더가 언제 컴퓨터의 제어권을 커널로 넘길 지 설정해야 하고, 커널을 시작하는 코드를 작성해야 한다.
부트 로더는 GRUB를 사용할 것이고, 부트 로더의 로딩에 관련한 설정은 Multiboot 표준을 따를 것이다.
해당 표준을 이용하면, 복잡한 과정없이 전역변수 몇개만 설정하면 부트로더에 관련한 설정을 마칠 수 있다.
이러한 내용들이 어셈블리어로 boot.s에 작성된다.
/* Declare constants for the multiboot header. */
.set ALIGN,    1<<0             /* align loaded modules on page boundaries */
.set MEMINFO,  1<<1             /* provide memory map */
.set FLAGS,    ALIGN | MEMINFO  /* this is the Multiboot 'flag' field */
.set MAGIC,    0x1BADB002       /* 'magic number' lets bootloader find the header */
.set CHECKSUM, -(MAGIC + FLAGS) /* checksum of above, to prove we are multiboot */

/*
Declare a multiboot header that marks the program as a kernel. These are magic
values that are documented in the multiboot standard. The bootloader will
search for this signature in the first 8 KiB of the kernel file, aligned at a
32-bit boundary. The signature is in its own section so the header can be
forced to be within the first 8 KiB of the kernel file.
*/
.section .multiboot
.align 4
.long MAGIC
.long FLAGS
.long CHECKSUM

/*
The multiboot standard does not define the value of the stack pointer register
(esp) and it is up to the kernel to provide a stack. This allocates room for a
small stack by creating a symbol at the bottom of it, then allocating 16384
bytes for it, and finally creating a symbol at the top. The stack grows
downwards on x86. The stack is in its own section so it can be marked nobits,
which means the kernel file is smaller because it does not contain an
uninitialized stack. The stack on x86 must be 16-byte aligned according to the
System V ABI standard and de-facto extensions. The compiler will assume the
stack is properly aligned and failure to align the stack will result in
undefined behavior.
*/
.section .bss
.align 16
stack_bottom:
.skip 16384 # 16 KiB
stack_top:

/*
The linker script specifies _start as the entry point to the kernel and the
bootloader will jump to this position once the kernel has been loaded. It
doesn't make sense to return from this function as the bootloader is gone.
*/
.section .text
.global _start
.type _start, @function
_start:
	/*
	The bootloader has loaded us into 32-bit protected mode on a x86
	machine. Interrupts are disabled. Paging is disabled. The processor
	state is as defined in the multiboot standard. The kernel has full
	control of the CPU. The kernel can only make use of hardware features
	and any code it provides as part of itself. There's no printf
	function, unless the kernel provides its own <stdio.h> header and a
	printf implementation. There are no security restrictions, no
	safeguards, no debugging mechanisms, only what the kernel provides
	itself. It has absolute and complete power over the
	machine.
	*/

	/*
	To set up a stack, we set the esp register to point to the top of the
	stack (as it grows downwards on x86 systems). This is necessarily done
	in assembly as languages such as C cannot function without a stack.
	*/
	mov $stack_top, %esp

	/*
	This is a good place to initialize crucial processor state before the
	high-level kernel is entered. It's best to minimize the early
	environment where crucial features are offline. Note that the
	processor is not fully initialized yet: Features such as floating
	point instructions and instruction set extensions are not initialized
	yet. The GDT should be loaded here. Paging should be enabled here.
	C++ features such as global constructors and exceptions will require
	runtime support to work as well.
	*/

	/*
	Enter the high-level kernel. The ABI requires the stack is 16-byte
	aligned at the time of the call instruction (which afterwards pushes
	the return pointer of size 4 bytes). The stack was originally 16-byte
	aligned above and we've pushed a multiple of 16 bytes to the
	stack since (pushed 0 bytes so far), so the alignment has thus been
	preserved and the call is well defined.
	*/
	call kernel_main

	/*
	If the system has nothing more to do, put the computer into an
	infinite loop. To do that:
	1) Disable interrupts with cli (clear interrupt enable in eflags).
	   They are already disabled by the bootloader, so this is not needed.
	   Mind that you might later enable interrupts and return from
	   kernel_main (which is sort of nonsensical to do).
	2) Wait for the next interrupt to arrive with hlt (halt instruction).
	   Since they are disabled, this will lock up the computer.
	3) Jump to the hlt instruction if it ever wakes up due to a
	   non-maskable interrupt occurring or due to system management mode.
	*/
	cli
1:	hlt
	jmp 1b

/*
Set the size of the _start symbol to the current location '.' minus its start.
This is useful when debugging or when you implement call tracing.
*/
.size _start, . - _start
Kernel Source
커널 코드를 작성한다. 이 코드에 대한 진입점은 위 bootstrap에서도 확인할 수 있듯이 kernel_main이다.
이 커널 코드는 VGA text mode buffer를 출력 장치로 사용하여 Hello world!를 게시하는 코드이다.
VGA text mode buffer(0xB8000)에 텍스트를 저장해 놓는 기능을 담은 코드이다.
이 코드는 일반적인 C코드와는 다르게 freestanding 코드이다. 일반적인 c코드는 hosted 코드로, c 표준 라이브러리 등을 사용할 수 있다. 해당 라이브러리들은 HOST 운영체제에 맞게 설계된 것으로, 운영체제 자체를 개발하기 위한 목적으로는 사용할 수 없다. 자체적으로 라이브러리를 제작하여야 한다. 이러한 제약조건을 가지고 작성된 코드를 일컬어 freestanding이라고 한다. 그러나, <stdbool.h>, <stddef.h>, <float.h>, <iso646.h>, <limits.h> 등 라이브러리들은 c 표준 라이브러리가 아니기 때문에, gcc를 이용한다면 해당 라이브러리들은 freestanding 코드에 사용할 수 있다.
#include <stdbool.h>
#include <stddef.h>
#include <stdint.h>

/* Check if the compiler thinks you are targeting the wrong operating system. */
#if defined(__linux__)
#error "You are not using a cross-compiler, you will most certainly run into trouble"
#endif

/* This tutorial will only work for the 32-bit ix86 targets. */
#if !defined(__i386__)
#error "This tutorial needs to be compiled with a ix86-elf compiler"
#endif

/* Hardware text mode color constants. */
enum vga_color {
	VGA_COLOR_BLACK = 0,
	VGA_COLOR_BLUE = 1,
	VGA_COLOR_GREEN = 2,
	VGA_COLOR_CYAN = 3,
	VGA_COLOR_RED = 4,
	VGA_COLOR_MAGENTA = 5,
	VGA_COLOR_BROWN = 6,
	VGA_COLOR_LIGHT_GREY = 7,
	VGA_COLOR_DARK_GREY = 8,
	VGA_COLOR_LIGHT_BLUE = 9,
	VGA_COLOR_LIGHT_GREEN = 10,
	VGA_COLOR_LIGHT_CYAN = 11,
	VGA_COLOR_LIGHT_RED = 12,
	VGA_COLOR_LIGHT_MAGENTA = 13,
	VGA_COLOR_LIGHT_BROWN = 14,
	VGA_COLOR_WHITE = 15,
};

static inline uint8_t vga_entry_color(enum vga_color fg, enum vga_color bg)
{
	return fg | bg << 4;
}

static inline uint16_t vga_entry(unsigned char uc, uint8_t color)
{
	return (uint16_t) uc | (uint16_t) color << 8;
}

size_t strlen(const char* str)
{
	size_t len = 0;
	while (str[len])
		len++;
	return len;
}

#define VGA_WIDTH   80
#define VGA_HEIGHT  25
#define VGA_MEMORY  0xB8000

size_t terminal_row;
size_t terminal_column;
uint8_t terminal_color;
uint16_t* terminal_buffer = (uint16_t*)VGA_MEMORY;

void terminal_initialize(void)
{
	terminal_row = 0;
	terminal_column = 0;
	terminal_color = vga_entry_color(VGA_COLOR_LIGHT_GREY, VGA_COLOR_BLACK);

	for (size_t y = 0; y < VGA_HEIGHT; y++) {
		for (size_t x = 0; x < VGA_WIDTH; x++) {
			const size_t index = y * VGA_WIDTH + x;
			terminal_buffer[index] = vga_entry(' ', terminal_color);
		}
	}
}

void terminal_setcolor(uint8_t color)
{
	terminal_color = color;
}

void terminal_putentryat(char c, uint8_t color, size_t x, size_t y)
{
	const size_t index = y * VGA_WIDTH + x;
	terminal_buffer[index] = vga_entry(c, color);
}

void terminal_putchar(char c)
{
	terminal_putentryat(c, terminal_color, terminal_column, terminal_row);
	if (++terminal_column == VGA_WIDTH) {
		terminal_column = 0;
		if (++terminal_row == VGA_HEIGHT)
			terminal_row = 0;
	}
}

void terminal_write(const char* data, size_t size)
{
	for (size_t i = 0; i < size; i++)
		terminal_putchar(data[i]);
}

void terminal_writestring(const char* data)
{
	terminal_write(data, strlen(data));
}

void kernel_main(void)
{
	/* Initialize terminal interface */
	terminal_initialize();

	/* Newline support is left as an exercise. */
	terminal_writestring("Hello, kernel World!\n");
}
Link
위에서 작성한 bootstrap.s와 kernel.c를 각각 컴파일하고 링크하는 작업을 진행한다.
먼저 boot.s를 assemble해 boot.o 오브젝트 파일을 생성한다.
i686-elf-as boot.s -o boot.o
kernel.c를 컴파일해 kernel.o 오브젝트 파일을 생성한다. freestanding 옵션을 설정하여 c 표준 라이브러리를 사용하지 않도록 한다.
i686-elf-gcc -c kernel.c -o kernel.o -std=gnu99 -ffreestanding -O2 -Wall -Wextra
boot.o와 kernel.o를 링크하여 하나의 바이너리 파일로 만드는 작업을 진행한다. 유저 프로그램을 개발할 때는 gcc가 제공하는 기본 링커 스크립트를 사용해도 무방하지만 커널을 개발할 때는 직접 링커 스크립트를 작성해야 한다. 부트로더, multiboot 표준에 맞추기 위해 직접 작성해줘야 하는 것으로 이해하였다.
/* The bootloader will look at this image and start execution at the symbol
   designated as the entry point. */
ENTRY(_start)

/* Tell where the various sections of the object files will be put in the final
   kernel image. */
SECTIONS
{
	/* It used to be universally recommended to use 1M as a start offset,
	   as it was effectively guaranteed to be available under BIOS systems.
	   However, UEFI has made things more complicated, and experimental data
	   strongly suggests that 2M is a safer place to load. In 2016, a new
	   feature was introduced to the multiboot2 spec to inform bootloaders
	   that a kernel can be loaded anywhere within a range of addresses and
	   will be able to relocate itself to run from such a loader-selected
	   address, in order to give the loader freedom in selecting a span of
	   memory which is verified to be available by the firmware, in order to
	   work around this issue. This does not use that feature, so 2M was
	   chosen as a safer option than the traditional 1M. */
	. = 2M;

	/* First put the multiboot header, as it is required to be put very early
	   in the image or the bootloader won't recognize the file format.
	   Next we'll put the .text section. */
	.text BLOCK(4K) : ALIGN(4K)
	{
		*(.multiboot)
		*(.text)
	}

	/* Read-only data. */
	.rodata BLOCK(4K) : ALIGN(4K)
	{
		*(.rodata)
	}

	/* Read-write data (initialized) */
	.data BLOCK(4K) : ALIGN(4K)
	{
		*(.data)
	}

	/* Read-write data (uninitialized) and stack */
	.bss BLOCK(4K) : ALIGN(4K)
	{
		*(COMMON)
		*(.bss)
	}

	/* The compiler may produce other sections, by default it will put them in
	   a segment with the same name. Simply add stuff here as needed. */
}
위 스크립트를 사용하여 링크한다.
i686-elf-gcc -T linker.ld -o myos.bin -ffreestanding -O2 -nostdlib boot.o kernel.o -lgcc
만들어진 myos.bin 바이너리 파일이 grub을 사용하여 multiboot 표준에 맞는지 확인한다.
  if grub-file --is-x86-multiboot myos.bin; then
    echo multiboot confirmed
  else
    echo the file is not multiboot
  fi
Boot
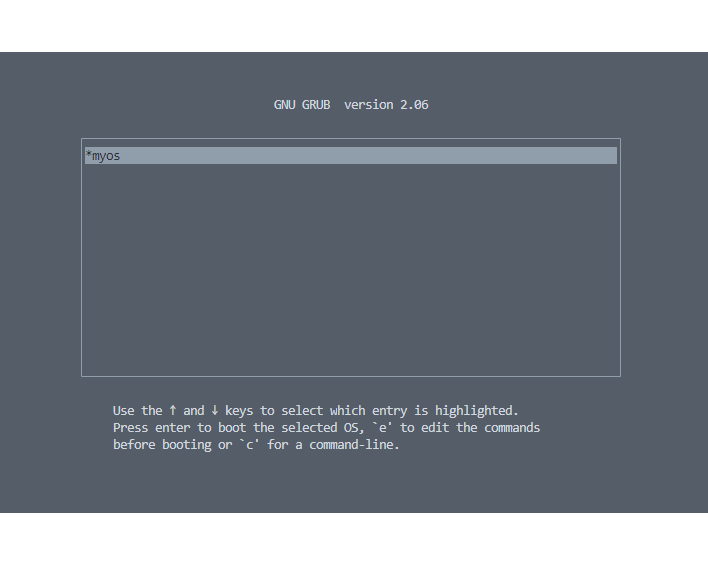
grub을 이용해 myos.bin을 담은 이미지 파일을 생성한다. 이를 위해 설정이 담긴 grub.cfg파일을 만든다.
  menuentry "myos" {
	  multiboot /boot/myos.bin
  }
이후, 부팅되어 구성될 파일 시스템을 구현한 디렉토리를 생성하고 필요한 파일들을 옮긴다. 해당 디렉토리에는 부팅 시 사용할 바이너리 파일이 담긴 /boot 하위 디렉토리가 있어야 한다. 해당 디렉토리를 기준 삼아 grub을 이용해 myos.iso 이미지 파일을 생성한다.
  mkdir -p isodir/boot/grub
  cp myos.bin isodir/boot/myos.bin
  cp grub.cfg isodir/boot/grub/grub.cfg
  grub-mkrescue -o myos.iso isodir
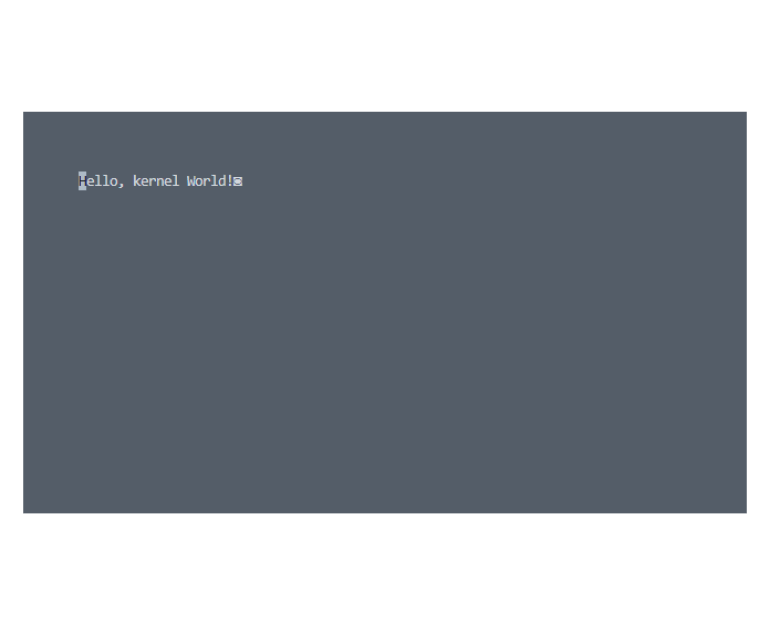
만들어진 이미지 파일을 qemu를 이용해 가상머신에서 부팅한다. 그래픽 모드를 해제함으로써 에러를 방지해야 한다.
qemu-system-i386 -cdrom myos.iso -curses
아래와 같이 부팅되는 것을 확인할 수 있다.
후기
튜토리얼에 나온 대로만 따라하면 크게 어려움 없이 부팅 시킬 수 있다. 어떤 식으로 커널 개발이 이루어지는지 간략하게 이해할 수 있었던 좋은 기회였다. 다른 문서들도 살펴보며 지식을 키워나가야 겠다.